IIS (Internet Information Services). We’ll look at what it does and how it works. You’ll learn how to enable it on Windows. And after we’ve established a baseline with managing IIS using the GUI, you’ll see how to work with it using the CLI. Let’s get started!
What Is IIS?
IIS is a web server that runs on the Microsoft .NET platform on the Windows OS. While it’s possible to run IIS on Linux and Macs using Mono, it’s not recommended and will likely be unstable. (There are other options, which I’ll present later). It’s versatile and stable, and it’s been widely used in production for many years. Version 10 is the most current. Once it’s installed you’ll see this welcome page in your browser. “Tervetuloa!”
But before we dig into the nitty-gritty of IIS, let’s start by defining a web server in a general sense.
What Is a Web Server?
The internet is good. And the internet cannot exist without web servers. But what exactly is a web server? Let’s define that in the abstract so we can have some context for how IIS fills this role.
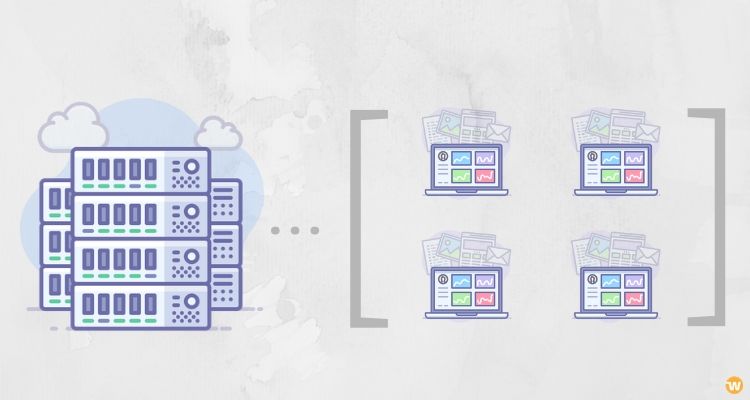
A web server is a process for hosting web applications. The web server allows an application to process messages that arrive through specific TCP ports (by default). For example, the default port for HTTP traffic is 80, and the one for HTTPS is 443.
When you visit a website in your browser, you don’t typically specify the port number unless the web server is configured to receive traffic on ports other than the default. Visiting http://www.example.com will send your request to port 80 implicitly. You could specify the port number if you’d like http://www.example.com:80, and https://www.example.com:443 for TLS (Transport Layer Security).
Assuming the default configuration and TLS is configured for your web application, the web server will receive all inbound traffic to ports 80 and 443. What the web server does with the traffic from there depends. There are countless options for how the web server can process those requests.
Below is the web hosting process.
The two main process models for web servers are to either handle all requests on a single thread, or to spawn a new thread for each request. Although the single-thread model (Node.js, for example) has some worker threads available, it typically only uses them for certain kinds of work, such as file system access. The thread-per-request model that IIS (and its lightweight cousin IIS Express) uses will grab a thread from a thread pool for each request.
Web servers typically handle requests using a request-response pattern. The client sends a request and receives a response if all goes well. HTTP protocol is the ubiquitous choice when communicating between a client and web server over the internet.
Features
IIS is rich with features. Most commonly, IIS is used to host ASP.NET web applications and static websites. It can also be used as an FTP server, host WCF services, and be extended to host web applications built on other platforms such as PHP.
There are built-in authentication options such as Basic, ASP.NET, and Windows auth. The latter is useful if you have a Windows Active Directory environment—users can be automatically signed into web applications using their domain account. Other built-in security features include TLS certificate management and binding for enabling HTTPS and SFTP on your sites, request filtering for whitelisting or blacklisting traffic, authorization rules, request logging, and a rich set of FTP-specific security options.
One key feature of IIS is the application pool. We’ll have to take a closer look at the application pool, as it’s a critical component of the IIS process model.
An invaluable feature is remote management. IIS can also be managed via the CLI or using PowerShell. You can script everything, which is great if you like the power that comes with being able to do so.
By now, you should have a good impression about the configurability and versatility of IIS. You should also be aware that it can be extended to serve (pun intended) many purposes besides hosting ASP.NET apps. Through extension, IIS becomes a highly versatile and stable web server for the Windows platform. Let’s take a look at how to install IIS on Windows 10. (The same process applies to Windows 7 and 8.)
Set up IIS
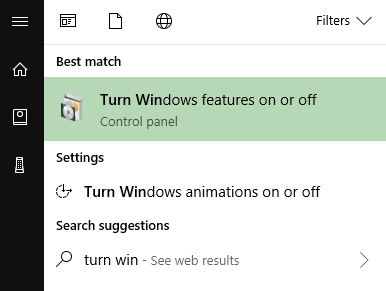
Calling it “installing” would be a bit much. After all, IIS is a feature in Windows. What you really need to do is enable the feature. In Windows 10, you can press the Windows key and type “turn win.” You should see “Turn Windows features on or off.”
Select that to open the “Windows Features” dialog. From here, you can turn on all sorts of additional features, including PowerShell 2.0, a deep directory tree of options for Internet Information Services (IIS), and a subsystem for Linux. (I have to say, that last one has come in handy for me numerous times, like when a Node app has some shell scripts as part of the npm build).
The Internet Information Services (IIS) option is the one we want!
Just clicking the box for it will give you a good starting point. You may, however, want to dig deeper. World Wide Web Services > Application Development Features is where you enable ASP.NET, CGI, and WebSocket Protocol. You can always come back to this if you need to make adjustments.
To enable IIS on Windows Server, you can either use PowerShell or Server Manager to install the “Web Role (IIS).” See this walkthrough for details.
Once you have all the desired IIS features selected, click OK and go get a fresh cup of coffee. When the install is done, you can get to the IIS GUI by typing “IIS” in the Windows search or by running “inetmgr.”
The GUI
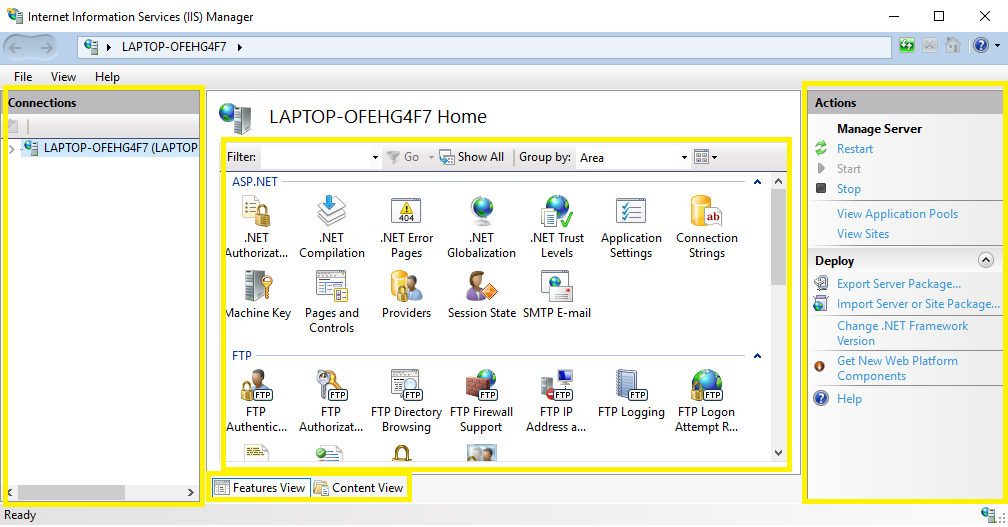
Before we get into details, I want to give you a quick intro to IIS Manager. I’ve highlighted the areas of interest because this thing is such a mess. It takes some getting used to, but there are a few things I can offer to help with, as it concerns getting around in here.
First of all, there are three panes. The left has the connected servers. (You can connect to remote servers too.) The middle pane is where you find all the features like application security, logging, filtering, and redirecting. Or when you select “Content View,” you’ll see the contents here in the middle instead. On the right is the actions pane. This changes depending on the selected context.
I’m not sure why that little extra icon at the bottom right is there, but you can resize the window down there too.
TIP: you can right-click most of the icons and use the context menu to perform the most common actions.
If you expand the “connection” in the connections pane, the first thing you should see is “Application Pools,” followed by “Sites.” We’re going to focus on those in the next two sections.
Application pools…What are they and how do they work?
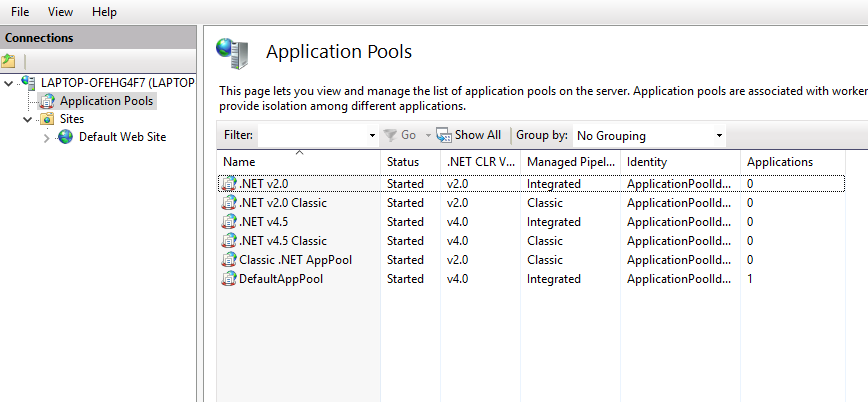
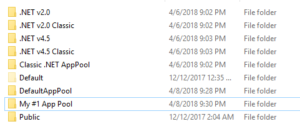
Here’s a look at the application pools that are set up by default in IIS. As you can see, there are combinations of v2.0 and v4.0, and of classic and integrated.
The integrated pipeline differs from the classic pipeline in that ASP.NET is integrated into the request pipeline of IIS. In classic mode, requests had to pass through one pipeline for IIS and another for ASP.NET. Integrated has been the preferred mode since IIS 7 was released with Windows Server 2008 and Vista. Don’t use classic unless you have to. Same goes for v2.0. They’re only for legacy support. In fact, if you don’t need those application pools, you might as well just go ahead and remove them. We don’t need any cruft hanging around!
A single application pool has zero to many worker processes (w3wp.exe) running at any given time. The worker processes run instances of your application.
Creating Application Pools
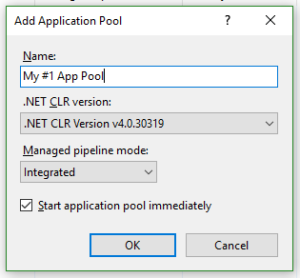
In the “Actions” pane on the right side of the IIS window, click “Add Application Pool…” to bring up the dialog. It’s pretty straightforward. You can usually just enter a name and press “enter” or click “OK.”
You can also add an application pool by right-clicking the “Application Pools” node in the “Connections” pane. The tip from earlier proves its value already!
App pool users
IIS creates a virtual user for each app pool (common nomenclature for application pool). These worker processes run as the app pool’s virtual user by default. They can run as a different user (a domain account, for example) if they need special permissions.
Even though I removed the app pools from the server, the virtual users live on!
These virtual users still get their own standard folders, such as “Desktop,” “Music,” and “Pictures.” They don’t chew up that much space (110 MB), but once the app pool is removed, those user folders are cruft and can be deleted.
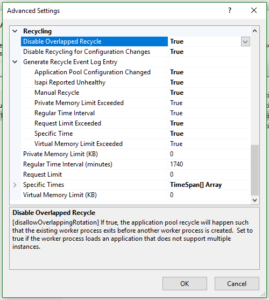
App pool recycling
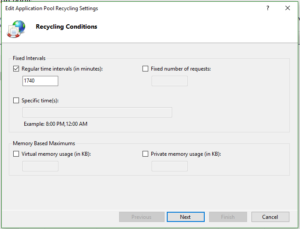
One key feature of app pools is recycling. By default, app pools recycle every 1740 minutes (29 hours), and when the configuration file changes. You can configure recycling to suit your needs. App pool recycling frees up the memory consumed by applications running in an app pool. Recycling can prevent runaway processes from chewing up all the memory on your server.
What kinds of things use memory in your process? Everything on the stack and heap—static variables and properties, anything in the memory cache, any objects that are referenced by another object, any blocks of memory waiting to be garbage collected, you get the picture.
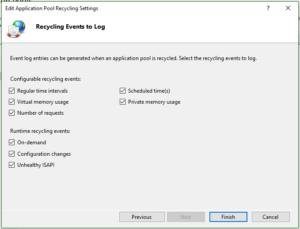
You can choose which events you would like to log (or not log). As you can see, not all options are shown in the previous dialog—”Runtime recycling events” don’t appear to be configurable. This isn’t entirely true.
A recycle starts a new process then spins down the current process. The new process will, as you would expect, have a new PID. You can change this behavior as well as other recycling behavior in “Advanced Settings…”. In fact, you can edit any of the recycling configurations in this menu. The “Recycling…” dialog is redundant in that respect. However, you can turn off recycling for config changes here. You probably don’t want to though. Your running app wouldn’t get the config updates.
Note that “overlapped recycle” implies that it’s possible to have more than one instance of the application. You should disable this only if your application requires it. Overlapped recycle prevents disruptions that would occur if the recycle waited for the current process to drain requests before starting the new process. In other words, no new requests would be handled until the current requests completed or the configurable timeout period elapsed (90 seconds by default).
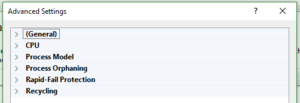
Advanced Configuration
There are far too many app pool configurations to iterate in detail in this post. For now, a brief overview will have to suffice. I’ll quickly rattle off some points about each of the areas of “Advanced Settings,” as shown below.
- The “General” setting will let you
- Change .NET CLR versions
- Allow 32-bit applications
- Change pipeline mode
- Set queue length (1000 requests by default)
- Set to run always or on demand
- The “CPU” option covers
- Throttling
- Processor affinity
- “Process model” will let you choose settings for
- Identity
- Idle timeout
- Max worker processes
- Health monitoring (You should turn this off locally for debugging because a halted debugger won’t respond to ping)
- “Process Orphaning” is useful for debugging unresponsive processes
- “Rapid-Fail Protection” is good for when you want to configure load balancer responses to failures
Sites
“Sites” is the node next to “Application Pools” in the server node of IIS manager. It’s here that you add and manage websites and FTP sites (if installed). While application pools have an advanced settings dialog, sites have many more configuration options! Sites have many features, each with their own configurations.
These features fall under three headings in the IIS manager:
- ASP.NET (if you have it installed)
- IIS
- Management
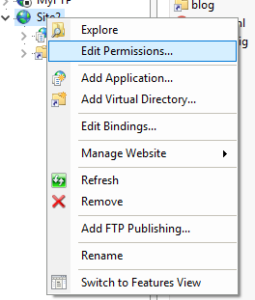
Context menu
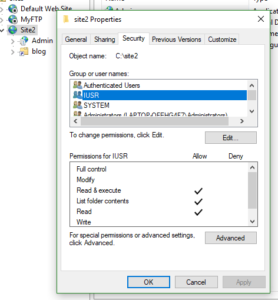
You can toggle between “Features” and “Content” when you have a site selected. You can right-click the site and open the folder from the context menu by selecting “Explore.” There are other things you can do from this context menu, such as edit permissions.
This actually just brings up the properties of the site’s folder. From there, you’ll have to switch to the “Security” tab to actually edit the permissions.
In typical Windows fashion, there are several other ways you can edit permissions. See your favorite Windows help sites for more information on how to set folder permissions.
You can perform several common tasks from the context menu. Inside the “Manage Website” item, you can start and stop the website, open it in your browser, and go to advanced settings. We’ll definitely want to look at those, but first, let’s talk about what you’ll see when you select “Edit Bindings…” which is also available in the “Action” pane as “Bindings…”.
Bindings
You’ll need to add a site binding in the “Bindings…” dialog if you’re enabling HTTPS for your site. You can also set the host name and port numbers there. If you have additional binding for your site, you can add those here as well. Perhaps you’re using the net.tcp or a net.pipe bindings (if you’ve added the features on the server and enabled them for the site). Or you can set an IP address here.
It’s possible to run more than one site listening on the same port. To do this, you’ll use different host names. For example, you could have admin.example.com bound to your admin site and blog.example.com bound to your blog. All example.com traffic would go to the same IP (load-balancer/server), but IIS would use the host header to direct traffic to the appropriate site. These are useful for white-label apps as well: acme.example.com, foo.example.com, bar.example.com.
Basic settings
“Basic Settings…” is the same dialog as you get when you first set up the site. You probably won’t need to go there unless you want to change the application pool or the location of the site or if you want to connect as a different user, rather than IUSR (pass thru). If you need to use a service account to access the site directory, you can choose “Connect as…” from the “Edit Site” dialog.
Note: you should take care to secure any directories you use in IIS. You can benefit from reading about how the default inetpub directory is secured.
Sub-sites and virtual directories
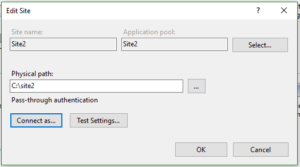
You can host several applications and virtual directories under one site. Applications can run in their own application pools, but virtual directories cannot. As shown below, I’ve set up an admin application and a blog virtual directory under Site2. They can be accessed using http://localhost/admin and http://localhost/blog. Both will respond with built-in error pages unless there’s something in the directories.
The source directories for sub-applications and virtual directories need not be subdirectories of the parent site. You can keep those directories anywhere you wish. You may want to map some common web resources (images or JS files) to a relative path for multiple sites. Virtual directories are perfect for this.
Default and error documents
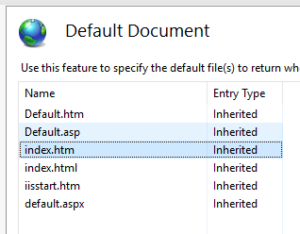
When a user visits the root of your site (www.example.com/), they’ll be presented with a default document. The defaults are shown below. You can add your own documents, remove documents, or disable them altogether. If you disable them, the user will get an ugly 403 error screen unless you’ve given permission to list folder contents (not recommended). It’s best to have a default document in place.
I’ve put an index document in each directory: the site, the application, and the virtual directory.
- Site2
- http://localhost/ will load the default document at Site2/index.html
- http://localhost/admin/ will load the default document at Site2/Admin/index.html
- http://localhost/blog/ will load the default document at Site2/Blog/index.html
If you’re worried about IIS taking up memory and CPU on your machine, don’t. Unless the worker processes are running (and handling requests with heavy processing), it sits idle. If you’re seeing heavy CPU usage, this troubleshooting guide can help, provided you’re using ASP.NET.
CLI and remote management
AppCmd.exe
AppCmd is the built-in CLI tool for configuring and managing IIS. You can use it to create sites and app pools, link virtual directories, and edit configurations. Let’s look at a few things it can do.
First of all, add %systemroot%\system32\inetsrv\ to your path so that you can run appcmd from a command prompt in any location.
Run the command prompt as administrator.
setx PATH "%PATH%;%systemroot%\system32\inetsrv\"
Try the following commands to explore appcmd:
- Run appcmd /? to see the help text
- See what apps are running with appcmd list app
- Use appcmd list backup to see backups of your IIS config
Add site
appcmd add site /name:"Dummy Site" /id:10 /bindings:http/*:81:
Now list apps again. You won’t see the new site you’ve added because it isn’t considered an app. If you go to the GUI and refresh your sites, you’ll see the new site there, but it’ll be broken. We need to add an app using appcmd.
appcmd add app /site.name:"Dummy Site" /path:"/"
This will only add the app to the site at the root. It will create an app named “Dummy Site/”. We still need to link the app to a virtual directory then point that to a physical path.
appcmd add vdir /app.name:"Dummy Site/" path:"/"

appcmd set vdir "Dummy Site/" /physicalPath:"c:\inetpub\wwwroot"
This is the verbose way to use appcmd to create an IIS site. There’s an easier way.
The EZ way
You can save a lot of keystrokes while creating the site if you set the physicalPath parameter in the first command. This will do the whole thing in one shot:
appcmd add site /name:"Dummy Site" /id:10 /bindings:http/*:81: /physicalPath:"c:\inetpub\wwwroot"
But knowing the other commands gives you a better idea of how an IIS app really works under the hood. In the past, I’ve used appcmd in the post-build script of ASP.NET proj files to ensure the site was set up locally on new developer machines. You can also do a backup and restore of IIS config using appcmd.
Deploying updates
To give you one more idea about using appcmd, consider doing the following:
- Create a “sites” folder.
- Create a subfolder for each site.
- Deploy versions to subfolders under each of those.
- Stage new versions.
- Use appcmd to update the site to use the new folder.
Given an app named “Hello World” pointing to C:\Sites\HelloWorld\1.0.0 and a new build “1.0.1” that’s been staged in C:\Sites\HelloWorld\1.0.1 , when it’s time to go live, then you can use the following command to flip the site to the new version:
appcmd set vdir "Dummy Site/" /physicalPath:"c:\Sites\HelloWorld\1.0.1"

appcmd recycle apppool /apppool.name:defaultapppool
And if you need to roll back your site, run the following:
appcmd set vdir "Dummy Site/" /physicalPath:"c:\Sites\HelloWorld\1.0.0"

appcmd recycle apppool /apppool.name:defaultapppool
IIS reset
“iisreset” is a separate executable used to stop, start, restart IIS or event to reboot the computer (/REBOOT). You can pass it a “computername” parameter to have it control IIS on another computer. You will need to run this as admin. Many developers and system admins like to use this after a deployment, and that’s not a bad idea either!
PowerShell
PowerShell has a powerful set of tools for managing IIS. You could also send the iisreset command remotely using Invoke-Command -ComputerName “computername” -ScriptBlock {iisreset}, provided you allow remote command invocation of arbitrary commands on your servers—and that’s generally not a good idea!
Despite my own security concerns with sending arbitrary remote commands using PowerShell, the IIS administration cmdlet are really useful for DevOps-style web server admin. You can check this documentation for IIS administration using PowerShell to get an idea of what it can do.
Shutting down
Despite all the features, configurations, and commands we’ve covered in this post, we’ve only scratched the surface. Each feature has its own configurations, and there are many extensions that can be added by installing the
Web Platform Installer extension.
And with that, let’s bring this post and the IIS server to a conclusion:
iisreset /stop